EJBCA/EJBCA的安装
来自站长百科
EJBCA是一个全功能的CA系统软件,它基于J2EE技术,并提供了一个强大的、高性能并基于组件的CA。EJBCA兼具灵活性和平台独立性,能够独立使用,也能和任何J2EE 应用程序集成。
安装环境[ ]
安装步骤[ ]
整合[ ]
- 拷贝文件%EJBCA_HOME%\conf\ejbca.properties.sample到%EJBCA_HOME%\conf\ejbca.properties,这个文件是ejbca的主配置文件,可以进行自定义配置,例如对CA的配置:
# ------------ Basic CA configuration ---------------------
# When upgrading, the important options are:
# - ca.keystorepass
# - ca.ocspkeystorepass

# This installation will create a first administrative CA. This CA will be used to create the first
# superadministrator and for the SSL server certificate of administrative web server.
# When the administrative web server have been setup you can create other CA:s and administrators.
# This is only used for administrative purposes,
# Enter a short name for the CA.
ca.name=AdminCA1

# The Distinguished Name of the CA.
# This is used in the CA certificate to distinguish the CA.
ca.dn=CN=AdminCA1,O=EJBCA Sample,C=SE

# The keysize in bits of the CA, only digits.
ca.keysize=2048

# The keytype, can be RSA or ECDSA
ca.keytype=RSA

# The validity in days for the CA, only digits.
ca.validity=3650

# The policy id of the CA. Policy id determines which PKI policy the CA uses.
# Type your policy id or use '2.5.29.32.0' for 'any policy' (rfc3280) or 'null' for no policy at all.
ca.policy=null

# This password is used internally to protect CA keystores in database (i.e. the CAs private key).
# foo123 is to keep compatibility with default installations of EJBCA 3.0, please change this if possible
# If upgrading from EJBCA 3.0.x, you should take this value from src/ca/ca/META-INF/ejb-jar.xml -> keyStorePass.
# The default value is the same for convenience.
ca.keystorepass=foo123
#ca.keystorepass=!secret!

# Password user to protect OCSP keystores in the database (CAs OCSP signer certificate).
# If upgrading from EJBCA 3.0.x, you should take this value from src/ca/ca/META-INF/ejb-jar.xml -> OCSPKeyStorePass.
# The default value is the same for convenience.
ca.ocspkeystorepass=foo123
#ca.ocspkeystorepass=ocsp!secret!

# Password user to protect XKMS keystores in the database (CAs XKMS signer/enc certificate).
# The default value is the same for convenience.
ca.xkmskeystorepass=foo123

# Password user to protect CMS keystores in the database (CAs CMS signer/enc certificate).
# The default value is the same for convenience.
ca.cmskeystorepass=foo123
由于只是实验性的学习,所以保持默认配置。原文档说明为:The default values works fine for a test installaton. If you are using JBoss < 4.0.3 you must
configure the property web.jsfimpl in conf/web.properties.
# Specifies the JSF implementation used by the application server EJBCA is deployed on.
# Possible values are: myfaces
# Using nojsf means that the admin-GUI will be limited with some functions not working.
# It can however be useful if there are problems with your application server and JSF/MyFaces.
# Use nojsf for JBoss < 4.0.3
#
# Default: myfaces
#web.jsfimpl=myfaces
如果使用的JBoss版本< 4.0.3,需要修改默认配置。
- 将mysql数据库jdbc链接程序包mysql-connector-java-5.0.6-bin.jar拷贝到%JBOSS_HOME%\server\default\lib目录下
- ejbca支持的数据库有MySQL, PostgreSQL 7 and 8, Oracle 8 and 9, Sybase, HypersonicSQL, SAPDB and MSSQL,默认的数据库配置是JBoss内建的HypersonicSQL数据库(该数据库有以下缺点:内存消耗太大、不支持全部SQL语句集),我们将其修改为MySQL的配置:
# ------------- Database configuration ------------------------

# jndi name of the datasource to use in deployment descriptors of ejbs.
#datasource.jndi-name=EjbcaDS

# Prefix for the jndi name of the datasource to use in deployment descriptors of ejbs.
# JBoss requires 'java:/' as divfix, while Weblogic does not want anything (''), and Glassfish wants jdbc/
# default: java:/
#datasource.jndi-name-divfix=java:/
#datasource.jndi-name-divfix=
#datasource.jndi-name-divfix=jdbc/

# Weblogic in combination with Oracle requires special handling of LONG/BLOB columns
# If, and only if, you are using Weblogic and Oracle, uncomment the row below.
# Use OracleBlob in Weblogic 8.x and Blob in Weblogic 9.x
# default:
#weblogic-oracle-columntype=@weblogic.dbms-column-type OracleBlob

# The database name selected for deployment, used to copy XDoclet merge files.
# All supported databases are defined below, others can easily be added
# See the document doc/howto/HOWTO-database.txt for database specifics and tips and tricks.
# Default: hsqldb
database.name=mysql

# The datasource mapping selected for deployment.
# The J2EE server needs to be configured with the appropriate datasource mapping.
# For JBoss this maps to a setting in standardjbosscmp-jdbc.xml and must match the database chosen above.
# All supported mappings are defined below, others can easily be added
# Default: Hypersonic SQL
datasource.mapping=mySQL

# Database connection url.
# This is the URL used to connect to the database, used to configure a new datasource in JBoss.
# Default: jdbc:hsqldb:${jboss.server.data.dir}${/}hypersonic${/}localDB
database.url=jdbc:mysql://127.0.0.1:3306/ejbca?characterEncoding=UTF-8

# JDBC driver classname.
# The J2EE server needs to be configured with the appropriate JDBC driver for the selected database
# Default: org.hsqldb.jdbcDriver
database.driver=com.mysql.jdbc.Driver

# Database username.
# Default: sa (works with hsqldb)
database.username=root

# Database password.
# Default: (blank works with hsqldb)
database.password=root
控制台[ ]
- 打开一个控制台(命令提示符),进入目录%EJBCA_HOME%,执行命令
ant bootstrap
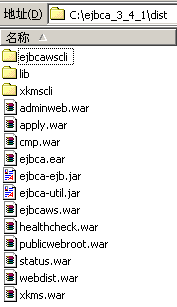
- 这时进行编译、打包和部署的工作。打包完成后,生成文件如下图所示:
- 其中ejbca.ear用来部署到jboss中。
- 打开另外一个控制台,进入%JBOSS_HOME%\bin,执行run命令,启动jboss服务器。
- 在上一个控制台(执行ant bootstrap的控制台)执行
ant install
进行安装工作。这个过程将生成所有的证书,密钥以及初始化CA所需要的所有内容。执行完成后,将生成${ejbca.home}/p12目录,该目录种包含管理员密钥。
it will generate all certificates, keys, etc needed to run with an initial CA. You will find admin keys in ${ejbca.home}/p12
Ø         tomcat.jks is for the servlet container (don't bother with it)
Ø         superadmin.p12 should be imported in your browser, that's your administration certificate.
- 停止jboss服务器。(可以在控制台按下CTRL+C)
- 在上一个控制台(执行ant bootstrap的控制台)执行
ant deploy
这个过程将重新部署ejbca应用程序。并进行servlet容器的keystore的配置。
- 重新启动JBOSS服务器,将%EJBCA_HOME%\p12目录下的superadmin.p12文件导入到浏览器中(默认密码为ejbca)
页面[ ]
打开浏览器,输入
http://localhost:8080/ejbca
进入公共页面,或者输入
https://localhost:8443/ejbca
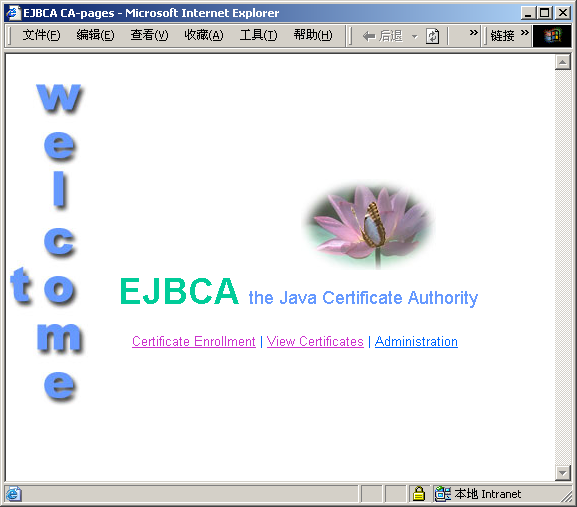
进入管理员页面。页面如下:
注意:
- 可以设置%JBOSS_HOME%\server\default\conf\log4j.xml中log等级为ERROR来减少控制台的日志输出数量。
- 网络上有很多配置数据库都需要设置例如mysql-ds.xml文件,还有拷贝文件到某某目录之类的,可能是由于版本关系吧,不需要拷贝也可以实现。
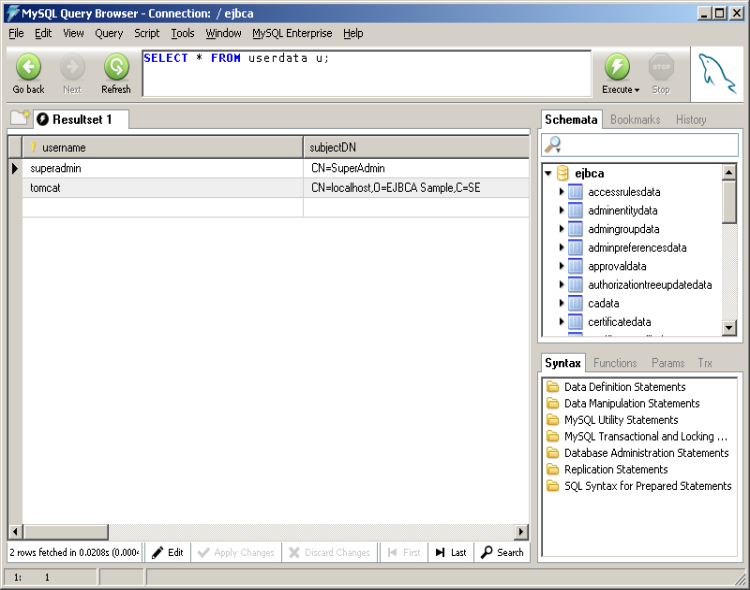
查看数据库ejbca,可以看到一些数据库表已经自动建立:
参考来源[ ]
http://read.newbooks.com.cn/info/130101.html
EJBCA使用手册导航 | ||||
|---|---|---|---|---|
|
|


