JumpServer是全球首款完全开源的堡垒机,采用Python和Django进行开发,满足4A规范,遵循GNU GPL v2.0开源协议,是一款专业的运维审计系统。站长百科下文主要解读JumpServer及安装使用方法。
一、堡垒机是什么
根据百度百科介绍,堡垒机是在一个特定的网络环境下,为了保障网络和数据不受入侵和破坏,运用各种技术手段监控对网络内的服务器、网络设备、安全设备、数据库等设备的操作行为,以便于集中报警、及时处理及审计定责。
其从功能上讲,它综合了核心系统运维和安全审计管控两大主干功能,从技术实现上讲,通过切断终端计算机对网络和服务器资源的直接访问,而采用协议代理的方式,接管了终端计算机对网络和服务器的访问。形象地说,终端计算机对目标的访问,均需要经过运维安全审计的翻译。打一个比方,运维安全审计扮演着看门者的工作,所有对网络设备和服务器的请求都要从这扇大门经过。因此运维安全审计能够拦截非法访问和恶意攻击,对不合法命令进行命令阻断,过滤掉所有对目标设备的非法访问行为,并对内部人员误操作和非法操作进行审计监控,以便事后责任追踪。
二、JumpServer简介
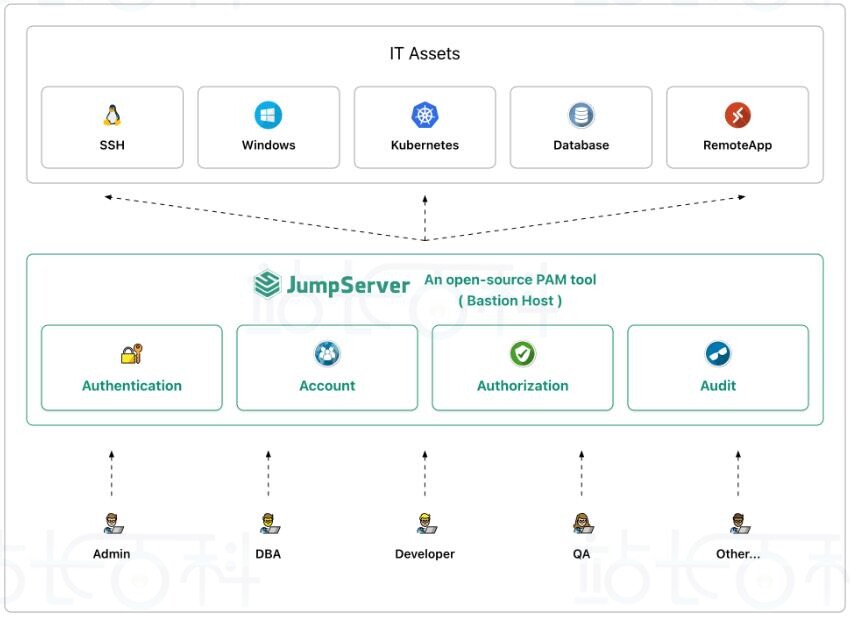
JumpServer是一个开源的特权访问管理 (PAM) 工具,能够通过网页浏览器为DevOps和IT团队提供按需和安全的SSH、RDP、Kubernetes、数据库和远程应用程序端点访问。
1、JumpServer工作流程如下图:
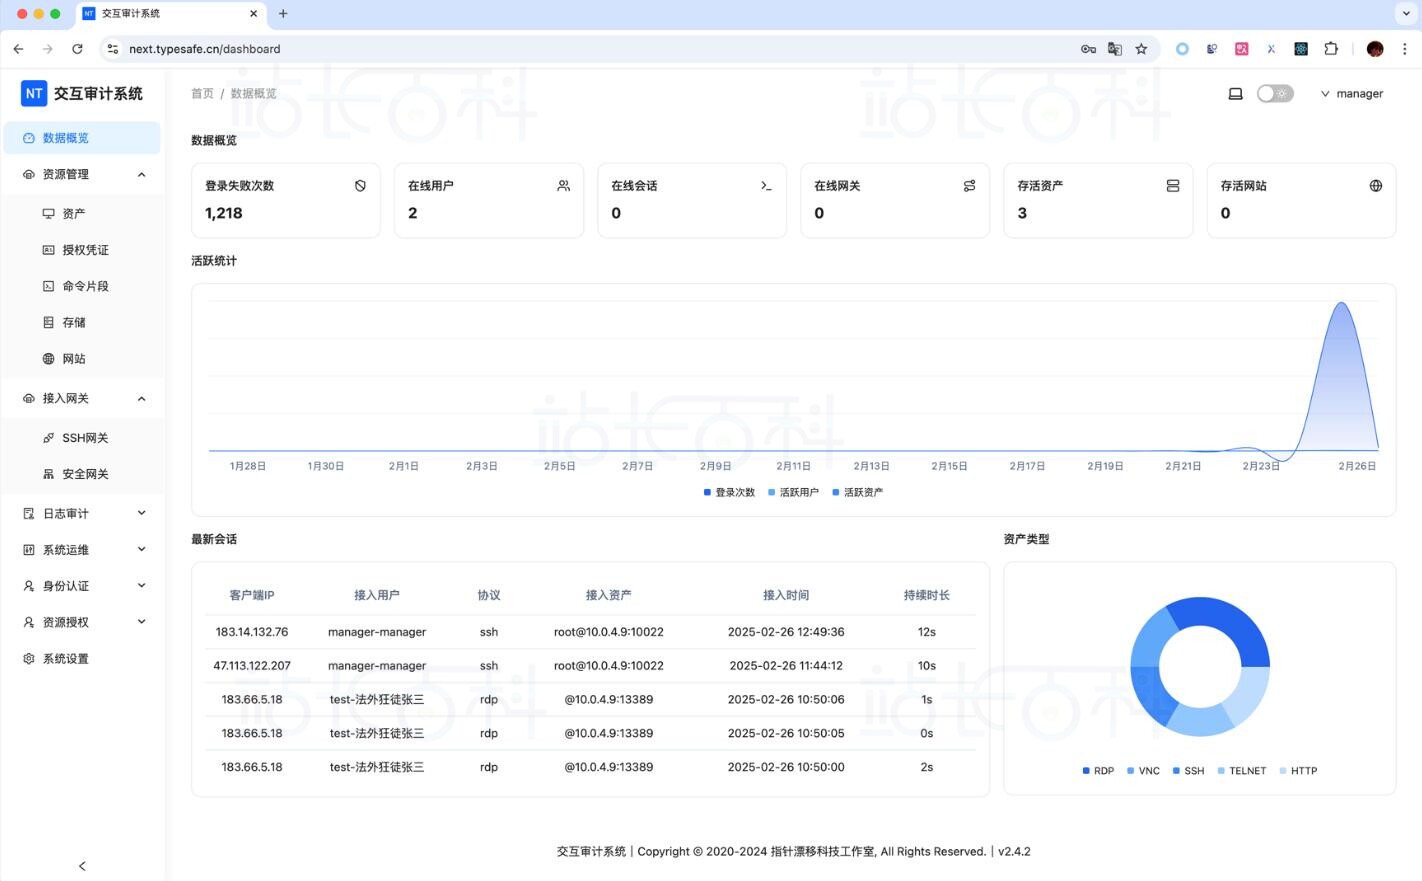
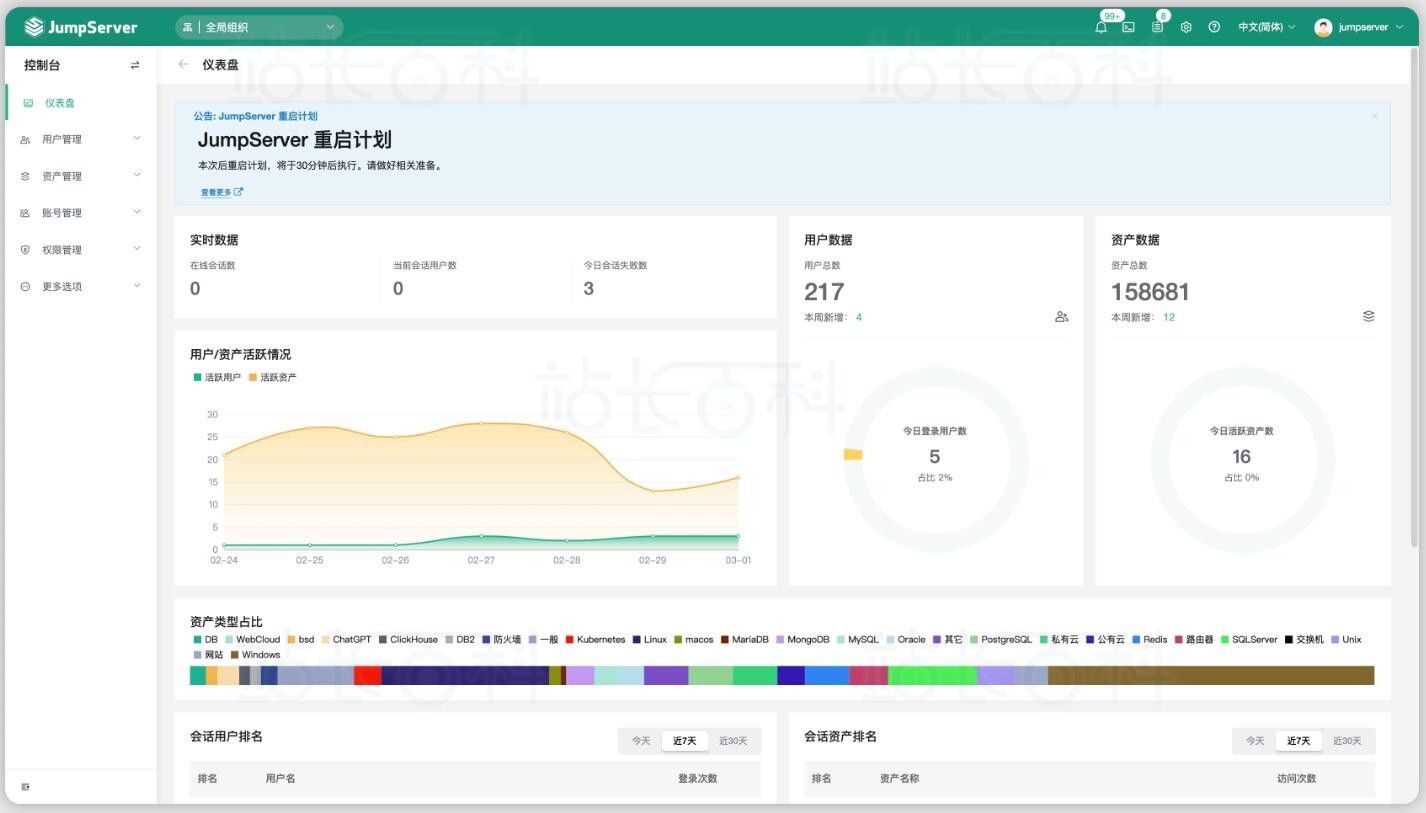
2、JumpServer堡垒机展示图
3、JumpServer堡垒机支持的资产类型包括:
- SSH (Linux / Unix / 网络设备 等)
- Windows (Web 方式连接 / 原生 RDP 连接)
- 数据库 (MySQL / MariaDB / Oracle / SQLServer / PostgreSQL / ClickHouse 等)
- NoSQL (Redis / MongoDB 等)
- 云服务 (Kubernetes / VMware vSphere 等)
- Web 站点 (各类系统的 Web 管理后台)
- 应用 (通过 Remote App 连接各类应用)
4、JumpServer优势
- 开源:零门槛,线上快速获取和安装;
- 分布式:轻松支持大规模并发访问;
- 无插件:仅需浏览器,极致的 Web Terminal 使用体验;
- 多云支持:一套系统,同时管理不同云上面的资产;
- 云端存储:审计录像云端存储,永不丢失;
- 多租户:一套系统,多个子公司和部门同时使用;
- 多应用支持:数据库,Windows 远程应用,Kubernetes。
三、JumpServer堡垒机安装教程(离线安装/在线安装)
1、操作系统要求
(1)操作系统
支持主流 Linux 发行版本(基于 Debian / RedHat,包括国产操作系统);Gentoo / Arch Linux 请通过源码安装。

Debian / Ubuntu:
apt-get update
apt-get install -y wget curl tar gettext iptables
RedHat / CentOS:
yum update
yum install -y wget curl tar gettext iptables
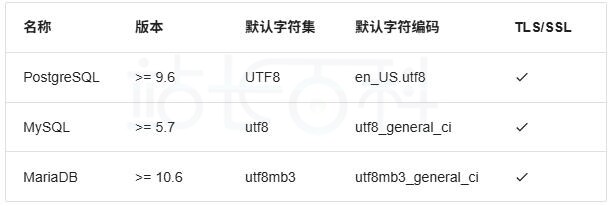
(2)数据库
JumpServer堡垒机需要使用 PostgreSQL、MySQL 或 MariaDB 存储数据,使用 Redis 缓存数据。

创建数据库SQL参考:
PostgreSQL:
create database JumpServer with encoding=’UTF8′;
postgres=# \l
List of databases
Name | Owner | Encoding | Locale Provider | Collate | Ctype | ICU Locale | ICU Rules | Access privileges
————–+————+———-+—————–+————+————+————+———–+———————–
JumpServer | postgres | UTF8 | libc | en_US.utf8 | en_US.utf8 | | |
(1 rows)
MySQL:
create database JumpServer default charset ‘utf8’;
mysql> show create database JumpServer;
+————+———————————————————————+
| Database | Create Database |
+————+———————————————————————+
| JumpServer | CREATE DATABASE `JumpServer` /*!40100 DEFAULT CHARACTER SET utf8 */ |
+————+———————————————————————+
1 row in set (0.00 sec)
MariaDB:
create database JumpServer default charset ‘utf8’;
MariaDB> show create database JumpServer;
+————+———————————————————————–+
| Database | Create Database |
+————+———————————————————————–+
| JumpServer | CREATE DATABASE `JumpServer` /*!40100 DEFAULT CHARACTER SET utf8mb3*/ |
+————+———————————————————————–+
1 row in set (0.001 sec)
2、离线安装JumpServer堡垒机
离线安装目前只支持 linux/amd64 架构, 其他架构请参考在线安装。
下载最新的JumpServer堡垒机linux/amd64离线包,并上传到部署服务器的 /opt 目录。
cd /opt
tar -xf JumpServer-ce-v4.10.2-x86_64.tar.gz
cd JumpServer-ce-v4.10.2-x86_64# 根据需要修改配置文件模板, 如果不清楚用途可以跳过修改
cat config-example.txt# JumpServer configuration file example.
#
# If you don’t understand the purpose, you can skip modifying this configuration file, the system will automatically fill in
# Complete parameter documentation https://docs.JumpServer.org/zh/v3/guide/env/################################# Image Configuration #################################
#
# The connection to docker.io in China will timeout or the download speed will be slow, enable this option to use Huawei Cloud image acceleration
# Replace the old version DOCKER_IMAGE_PREFIX
#
# DOCKER_IMAGE_MIRROR=1# Image pull policy Always, IfNotPresent
# Always means that the latest image will be pulled every time, IfNotPresent means that the image will be pulled only if it does not exist locally
#
# IMAGE_PULL_POLICY=Always############################## Installation Configuration #############################
#
# JumpServer database persistence directory, by default, recordings, task logs are in this directory
# Please modify according to the actual situation, the database file (.sql) and configuration file backed up during the upgrade will also be saved to this directory
#
VOLUME_DIR=/data/JumpServer# Encryption key, please ensure that SECRET_KEY is consistent with the old environment when migrating, do not use special strings
# (*) Warning: Keep this value secret.
# (*) Do not disclose SECRET_KEY to anyone
#
SECRET_KEY=# The token used by the component to register with core, please keep BOOTSTRAP_TOKEN consistent with the old environment when migrating,
# Do not use special strings
# (*) Warning: Keep this value secret.
# (*) Do not disclose BOOTSTRAP_TOKEN to anyone
#
BOOTSTRAP_TOKEN=# Log level INFO, WARN, ERROR
#
LOG_LEVEL=ERROR# The network segment used by the JumpServer container, please do not conflict with the existing network, modify according to the actual situation
#
DOCKER_SUBNET=192.168.250.0/24# ipv6 nat, no need to enable under normal circumstances
# If the host does not support ipv6, enabling this option will prevent the real client ip address from being obtained
#
USE_IPV6=0
DOCKER_SUBNET_IPV6=fc00:1010:1111:200::/64################################# DB Configuration ####################################
# For external databases, you need to enter the correct database information, the system will automatically handle the built-in database
# (*) The password part must not contain single quotes and double quotes
#
DB_ENGINE=postgresql
DB_HOST=postgresql
DB_PORT=5432
DB_USER=postgres
DB_PASSWORD=
DB_NAME=JumpServer# If external MySQL needs to enable TLS/SSL connection, refer to https://docs.JumpServer.org/zh/v3/installation/security_setup/mysql_ssl/
#
# DB_USE_SSL=true################################# Redis Configuration #################################
# For external Redis, please enter the correct Redis information, the system will automatically handle the built-in Redis
# (*) The password part must not contain single quotes and double quotes
#
REDIS_HOST=redis
REDIS_PORT=6379
REDIS_PASSWORD=# If you are using external Redis Sentinel, please manually fill in the following content
#
# REDIS_SENTINEL_HOSTS=mymaster/192.168.100.1:26379,192.168.100.1:26380,192.168.100.1:26381
# REDIS_SENTINEL_PASSWORD=your_sentinel_password
# REDIS_PASSWORD=your_redis_password
# REDIS_SENTINEL_SOCKET_TIMEOUT=5# If external Redis needs to enable TLS/SSL connection, refer to https://docs.JumpServer.org/zh/v3/installation/security_setup/redis_ssl/
#
# REDIS_USE_SSL=true################################# Access Configuration ################################
# The service port provided to the outside, if it conflicts with the existing service, please modify it yourself
#
HTTP_PORT=80################################# HTTPS Configuration #################################
# Refer to https://docs.JumpServer.org/zh/v3/installation/proxy/ for configuration
#
# HTTPS_PORT=443
# SERVER_NAME=your_domain_name
# SSL_CERTIFICATE=your_cert
# SSL_CERTIFICATE_KEY=your_cert_key
## Nginx file upload and download size limit
#
CLIENT_MAX_BODY_SIZE=4096m################################# Component Configuration #############################
# Component registration use, by default, register to the core container, the cluster environment needs to be modified to the cluster vip address
#
CORE_HOST=http://core:8080
PERIOD_TASK_ENABLED=true# Core Session definition,
# SESSION_COOKIE_AGE indicates how many seconds the session expires after idling,
# SESSION_EXPIRE_AT_BROWSER_CLOSE=true means that the session expires as soon as the browser is closed
#
# SESSION_COOKIE_AGE=86400
SESSION_EXPIRE_AT_BROWSER_CLOSE=false# Trusted DOMAINS definition,
# Define the trusted access IP, please modify according to the actual situation, if it is a public IP, please change to the corresponding public IP,
# DOMAINS=”demo.JumpServer.org:443″
# DOMAINS=”172.17.200.191:80″
# DOMAINS=”demo.JumpServer.org:443,172.17.200.191:80″
DOMAINS=# Configure the components that do not need to be started, by default all components will be started, if you do not need a certain component, you can set {component name}_ENABLED to 0 to turn it off
# CORE_ENABLED=0
# CELERY_ENABLED=0
# KOKO_ENABLED=0
# LION_ENABLED=0
# CHEN_ENABLED=0
# WEB_ENABLED=0# Lion enables font smoothing to optimize the experience
#
JumpServer_ENABLE_FONT_SMOOTHING=true################################# XPack Configuration #################################
# XPack package, invalid setting in open source version
#
SSH_PORT=2222
RDP_PORT=3389
XRDP_PORT=3390
MAGNUS_MYSQL_PORT=33061
MAGNUS_MARIADB_PORT=33062
MAGNUS_REDIS_PORT=63790
MAGNUS_POSTGRESQL_PORT=54320
MAGNUS_SQLSERVER_PORT=14330
MAGNUS_ORACLE_PORTS=30000-30030################################## Other Configuration ################################
# The terminal uses the host HOSTNAME as the identifier, automatically generated during the first installation
#
SERVER_HOSTNAME=${HOSTNAME}# Use built-in SLB, if the client IP address obtained by the Web page is not correct, please set USE_LB to 0
# When USE_LB is set to 1, use the configuration proxy_set_header X-Forwarded-For $remote_addr
# When USE_LB is set to 0, use the configuration proxy_set_header X-Forwarded-For $proxy_add_x_forwarded_for
USE_LB=1# The current running version number of JumpServer, automatically generated after installation and upgrade
#
TZ=Asia/Shanghai
CURRENT_VERSION=# 安装
./jmsctl.sh install# 启动
./jmsctl.sh start
安装完成后 JumpServer 配置文件路径为: /opt/JumpServer/config/config.txt
cd JumpServer-ce-v4.10.2-x86_64
# 启动
./jmsctl.sh start# 停止
./jmsctl.sh down# 卸载
./jmsctl.sh uninstall# 帮助
./jmsctl.sh -h
安装成功后,通过浏览器访问登录JumpServer堡垒机:
地址: http://<JumpServer服务器IP地址>:<服务运行端口>
用户名: admin
密码: ChangeMe
3、在线安装JumpServer堡垒机
以中国大陆地区为例演示:
cd /opt
wget https://resource.fit2cloud.com/jumpserver/installer/releases/download/v4.10.2/jumpserver-installer-v4.10.2.tar.gz
tar -xf jumpserver-installer-v4.10.2.tar.gz
cd jumpserver-installer-v4.10.2# 根据需要修改配置文件模板, 如果不清楚用途可以跳过修改
cat config-example.txt# JumpServer configuration file example.
#
# If you don’t understand the purpose, you can skip modifying this configuration file, the system will automatically fill in
# Complete parameter documentation https://docs.jumpserver.org/zh/v3/guide/env/################################# Image Configuration #################################
#
# The connection to docker.io in China will timeout or the download speed will be slow, enable this option to use Huawei Cloud image acceleration
# Replace the old version DOCKER_IMAGE_PREFIX
#
# DOCKER_IMAGE_MIRROR=1# Image pull policy Always, IfNotPresent
# Always means that the latest image will be pulled every time, IfNotPresent means that the image will be pulled only if it does not exist locally
#
# IMAGE_PULL_POLICY=Always############################## Installation Configuration #############################
#
# JumpServer database persistence directory, by default, recordings, task logs are in this directory
# Please modify according to the actual situation, the database file (.sql) and configuration file backed up during the upgrade will also be saved to this directory
#
VOLUME_DIR=/data/jumpserver# Encryption key, please ensure that SECRET_KEY is consistent with the old environment when migrating, do not use special strings
# (*) Warning: Keep this value secret.
# (*) Do not disclose SECRET_KEY to anyone
#
SECRET_KEY=# The token used by the component to register with core, please keep BOOTSTRAP_TOKEN consistent with the old environment when migrating,
# Do not use special strings
# (*) Warning: Keep this value secret.
# (*) Do not disclose BOOTSTRAP_TOKEN to anyone
#
BOOTSTRAP_TOKEN=# Log level INFO, WARN, ERROR
#
LOG_LEVEL=ERROR# The network segment used by the JumpServer container, please do not conflict with the existing network, modify according to the actual situation
#
DOCKER_SUBNET=192.168.250.0/24# ipv6 nat, no need to enable under normal circumstances
# If the host does not support ipv6, enabling this option will prevent the real client ip address from being obtained
#
USE_IPV6=0
DOCKER_SUBNET_IPV6=fc00:1010:1111:200::/64################################# DB Configuration ####################################
# For external databases, you need to enter the correct database information, the system will automatically handle the built-in database
# (*) The password part must not contain single quotes and double quotes
#
DB_ENGINE=postgresql
DB_HOST=postgresql
DB_PORT=5432
DB_USER=postgres
DB_PASSWORD=
DB_NAME=jumpserver# If external MySQL needs to enable TLS/SSL connection, refer to https://docs.jumpserver.org/zh/v3/installation/security_setup/mysql_ssl/
#
# DB_USE_SSL=true################################# Redis Configuration #################################
# For external Redis, please enter the correct Redis information, the system will automatically handle the built-in Redis
# (*) The password part must not contain single quotes and double quotes
#
REDIS_HOST=redis
REDIS_PORT=6379
REDIS_PASSWORD=# If you are using external Redis Sentinel, please manually fill in the following content
#
# REDIS_SENTINEL_HOSTS=mymaster/192.168.100.1:26379,192.168.100.1:26380,192.168.100.1:26381
# REDIS_SENTINEL_PASSWORD=your_sentinel_password
# REDIS_PASSWORD=your_redis_password
# REDIS_SENTINEL_SOCKET_TIMEOUT=5# If external Redis needs to enable TLS/SSL connection, refer to https://docs.jumpserver.org/zh/v3/installation/security_setup/redis_ssl/
#
# REDIS_USE_SSL=true################################# Access Configuration ################################
# The service port provided to the outside, if it conflicts with the existing service, please modify it yourself
#
HTTP_PORT=80################################# HTTPS Configuration #################################
# Refer to https://docs.jumpserver.org/zh/v3/installation/proxy/ for configuration
#
# HTTPS_PORT=443
# SERVER_NAME=your_domain_name
# SSL_CERTIFICATE=your_cert
# SSL_CERTIFICATE_KEY=your_cert_key
## Nginx file upload and download size limit
#
CLIENT_MAX_BODY_SIZE=4096m################################# Component Configuration #############################
# Component registration use, by default, register to the core container, the cluster environment needs to be modified to the cluster vip address
#
CORE_HOST=http://core:8080
PERIOD_TASK_ENABLED=true# Core Session definition,
# SESSION_COOKIE_AGE indicates how many seconds the session expires after idling,
# SESSION_EXPIRE_AT_BROWSER_CLOSE=true means that the session expires as soon as the browser is closed
#
# SESSION_COOKIE_AGE=86400
SESSION_EXPIRE_AT_BROWSER_CLOSE=false# Trusted DOMAINS definition,
# Define the trusted access IP, please modify according to the actual situation, if it is a public IP, please change to the corresponding public IP,
# DOMAINS=”demo.jumpserver.org:443″
# DOMAINS=”172.17.200.191:80″
# DOMAINS=”demo.jumpserver.org:443,172.17.200.191:80″
DOMAINS=# Configure the components that do not need to be started, by default all components will be started, if you do not need a certain component, you can set {component name}_ENABLED to 0 to turn it off
# CORE_ENABLED=0
# CELERY_ENABLED=0
# KOKO_ENABLED=0
# LION_ENABLED=0
# CHEN_ENABLED=0
# WEB_ENABLED=0# Lion enables font smoothing to optimize the experience
#
JUMPSERVER_ENABLE_FONT_SMOOTHING=true################################# XPack Configuration #################################
# XPack package, invalid setting in open source version
#
SSH_PORT=2222
RDP_PORT=3389
XRDP_PORT=3390
MAGNUS_MYSQL_PORT=33061
MAGNUS_MARIADB_PORT=33062
MAGNUS_REDIS_PORT=63790
MAGNUS_POSTGRESQL_PORT=54320
MAGNUS_SQLSERVER_PORT=14330
MAGNUS_ORACLE_PORTS=30000-30030################################## Other Configuration ################################
# The terminal uses the host HOSTNAME as the identifier, automatically generated during the first installation
#
SERVER_HOSTNAME=${HOSTNAME}# Use built-in SLB, if the client IP address obtained by the Web page is not correct, please set USE_LB to 0
# When USE_LB is set to 1, use the configuration proxy_set_header X-Forwarded-For $remote_addr
# When USE_LB is set to 0, use the configuration proxy_set_header X-Forwarded-For $proxy_add_x_forwarded_for
USE_LB=1# The current running version number of JumpServer, automatically generated after installation and upgrade
#
TZ=Asia/Shanghai
CURRENT_VERSION=# 安装
./jmsctl.sh install# 启动
./jmsctl.sh start
安装完成后 JumpServer 配置文件路径为: /opt/jumpserver/config/config.txt
cd /opt/jumpserver-installer-v4.10.2
# 启动
./jmsctl.sh start# 停止
./jmsctl.sh down# 卸载
./jmsctl.sh uninstall# 帮助
./jmsctl.sh -h
安装成功后,通过浏览器访问登录JumpServer:
地址: http://<JumpServer服务器IP地址>:<服务运行端口>
用户名: admin
密码: ChangeMe

相关阅读:《Next Terminal堡垒机快速入门(简介+安装+使用)》
-

广告合作
-

QQ群号:4114653